Channel Plans
Channel Plans only apply to PMP networks (including cnWave 5G Fixed) and are different for 60 GHz cnWave PMP networks.
PMP Channel Plans
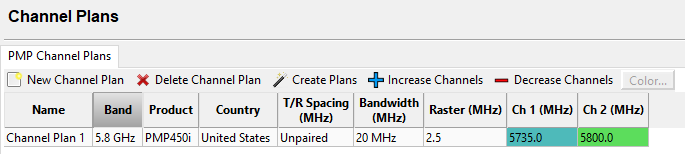
Use the PMP Channel Plans to define a group of channels to be used within a PMP network. Allocate colors to each channel to show a visualization of the frequency plan in the Offline Map. This is a quick and easy way to spot potential issues.
To create an individual channel plan select New Channel Plan  and a row will be added to the Channel Plan. Set the Band, Product, Country, T/R Spacing, Bandwidth and Raster from the drop down lists. Then choose the frequencies for each channel from the drop down list in each channel. The list of available frequencies for subsequent channels is dependent on the previous frequencies selected.

T/R Spacing is only used by cnReach products. “Unpaired” uses the same frequency for transmit and receive. When a T/R spacing is shown the channels selected are the high channels used for the transmit frequencies at the Access Point, the low frequencies are the AP transmit frequencies minus the T/R spacing and are used as the transmit frequencies at the SM.
If required increase  or decrease
  the number of channels required.
To set the color for each Channel, either right click on the Channel and choose Color or select the Channel and then click on Color from the toolbar.
To automatically create rows for the product configurations in the project file click on Create Plans  . A row for each Band, Product, Country and Bandwidth combination will be added to the Channel Plan list.
To delete a Channel Plan, select the row for the plan to delete and then click on Delete Channel Plan  .
.
Channel Plan Menu
60 GHz cnWave Channel Planning
Use the 60 GHz cnWave Channel Planning tab to allocate channels, golay codes and polarities to a 60 GHz cnWave network.
To configure the channel plan choose Set Channel, Set Golay Code or Set Polarity and then one of the options below the menu. This activates that choice and it is displayed in the menu bar to the right of the icons. The example below shows how to set the Polarity to Even.

60 GHz cnWave Channel Plan Active Choice Selection
The cursor on the map changes to a target icon ![]() , then select each sector to set it to the chosen value.
, then select each sector to set it to the chosen value.
The legend in the top right hand corner expands with each new combination of channel, golay code and polarity that is added. The channel and golay code use different colors to show each combination. The sector is shaded to show the polarity, Even polarity sectors fade from the center of the sector outwards, Odd polarity sectors fade from the edge of the sector towards the center.
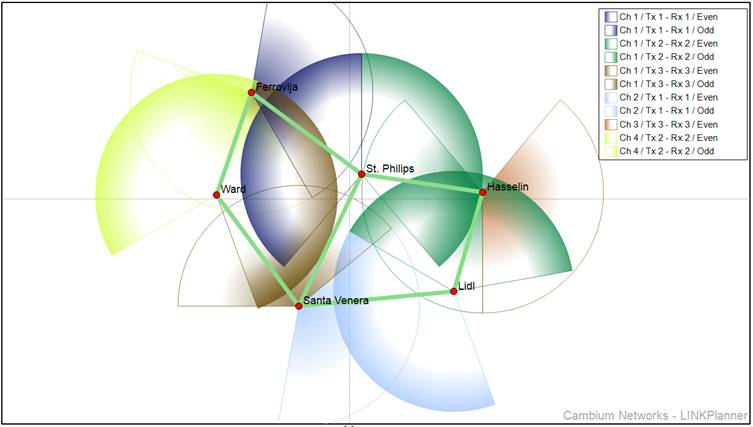
60 GHz cnWave Channel Plan
To change the color for a configuration click on the color symbol in the legend and choose a new color, then click OK. The new color scheme is saved in the user preferences.
To control which options are visible on the map tick/untick the options in the display menu on the left of the screen. Displaying a limited set of combinations makes it easier to see any overlap issues for that configuration.
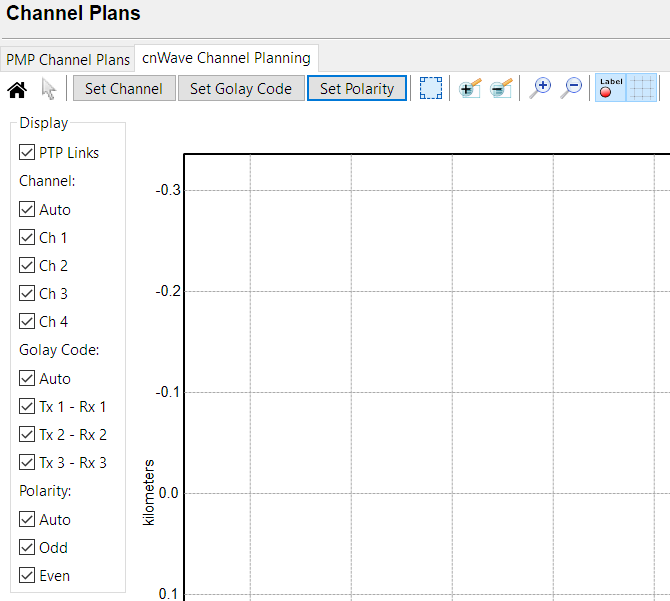
60 GHz cnWave Channel Plan Display Control