Updating Link Profiles
When link profiles have been verified, they must be updated. To update a profile, select the link in the navigation tree to view the Link Page. The Profile Visualization Chart with Clutter or Profile Visualization Chart without Clutter must be updated to include obstructions and, if the path is over water, to allow for reflection, see Unlicensed Band Reflection Editor.
Profile Visualization Chart with Clutter
Profile Visualization Chart without Clutter
Obstructions with Clutter
Double-click on the Profile visualization chart. The Profile Editor with Clutter page is displayed. Enter or update the Range or Obstruction height as required. For example, enter a 9 meter high Obstruction at Range 1.091 km and a 7 meter high Obstruction at Range 1.386 km.
If necessary, make allowances for changes to clutter type and extended additional obstructions:
- An obstruction of roughly constant height (for example a forest) may extend over two or more points. If the default clutter height is not correct for this local area then additional height can be added using the obstruction option. To enter such an obstruction, select all the affected Obstruction Height cells, type a value and press Enter. For example, if a forest with 12 m high trees extends from Range 0.5 km to 0.7 km, but the clutter type is set to Rural, select the Clutter Type column for this range and change to Light Trees, which give a 5 m height, then select the Obstruction Height cells for this range, type 7 (12 m - 5 m) and press Enter.
- If an isolated tall building partially obstructs the Fresnel zone by cutting vertically into one side, but has not been included in the clutter type, treat it as though it cuts horizontally into the bottom of the Fresnel zone. For example, if it extends 3 meters into the right hand side of the zone, enter it as a 3 m high obstruction.
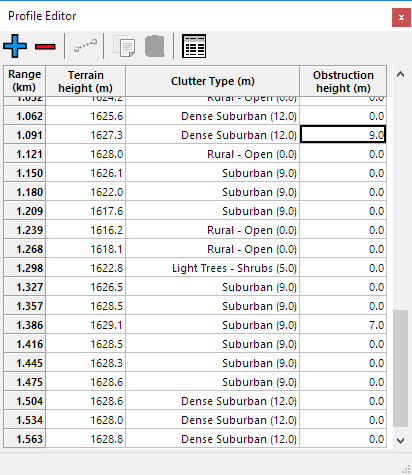
Profile Editor with Clutter
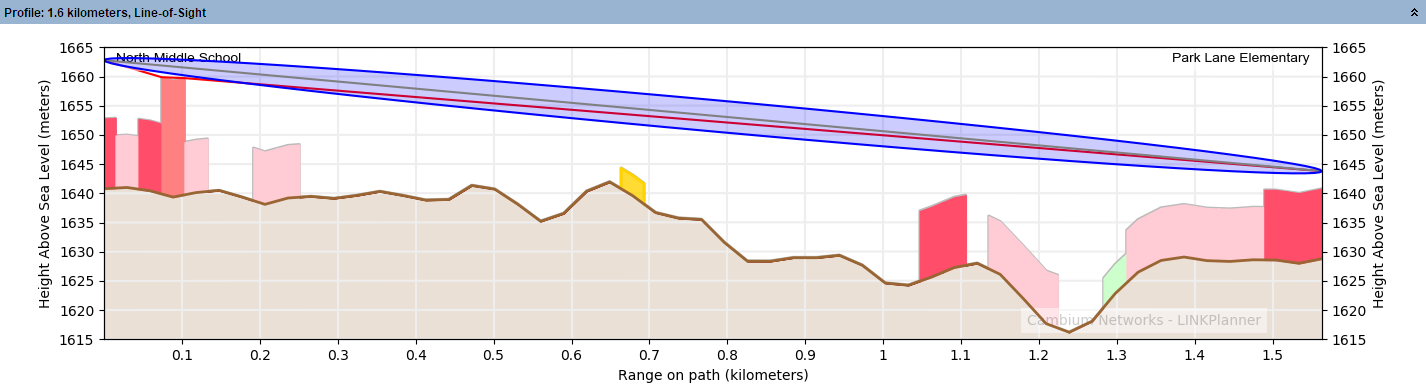
The Profile is updated to represent the obstructions as yellow blocks above the terrain and clutter

Profile Updated With Clutter and Obstructions (in yellow)

When Use Clutter? is enabled obstructions are added to the path as blocks for the entire pixel and the obstruction loss is calculated using ITU-R P.526-14, method for a general terrestrial path.
Obstructions without Clutter
Double-click on the Profile visualization chart. The Profile Editor page is displayed. Enter or update the Range or Obstruction height as required. For example, enter a 4 meter high Obstruction at Range 0.501 km and a 3.5 meter high Obstruction at Range 0.678 km.
If necessary, make allowances for forests and tall buildings:
- An obstruction of roughly constant height (for example a forest) may extend over two or more points. To enter such an obstruction, select all the affected Obstruction Height cells, type a value and press Enter. For example, if a forest with 12 m high trees extends from Range 1 km to 1.2 km, select the Obstruction Height cells for this range, type 12 and press Enter.
- If a tall building partially obstructs the Fresnel zone by cutting vertically into one side, treat it as though it cuts horizontally into the bottom of the Fresnel zone. For example, if it extends 3 meters into the right hand side of the zone, enter it as a 3 m high obstruction.
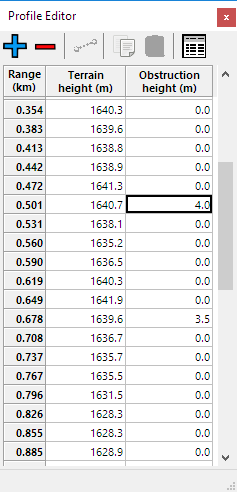
Profile Editor
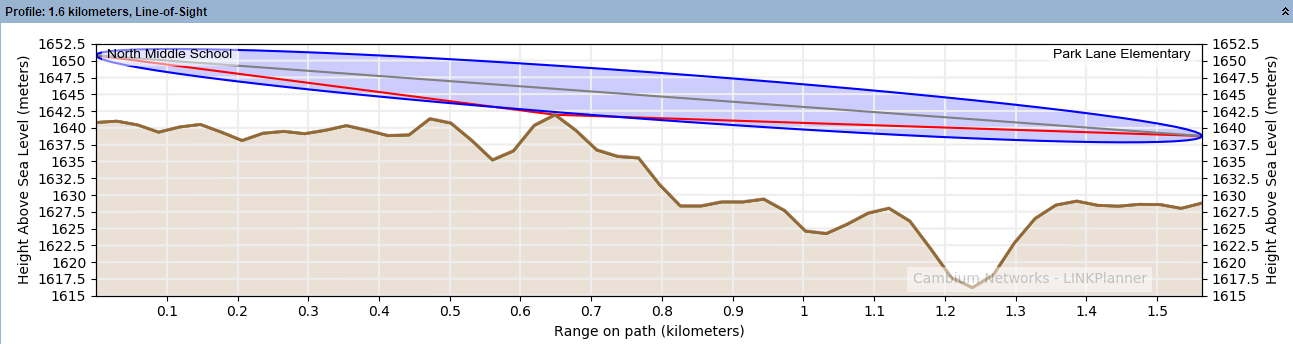
The Profile is updated to represent the obstructions as yellow points above the terrain.
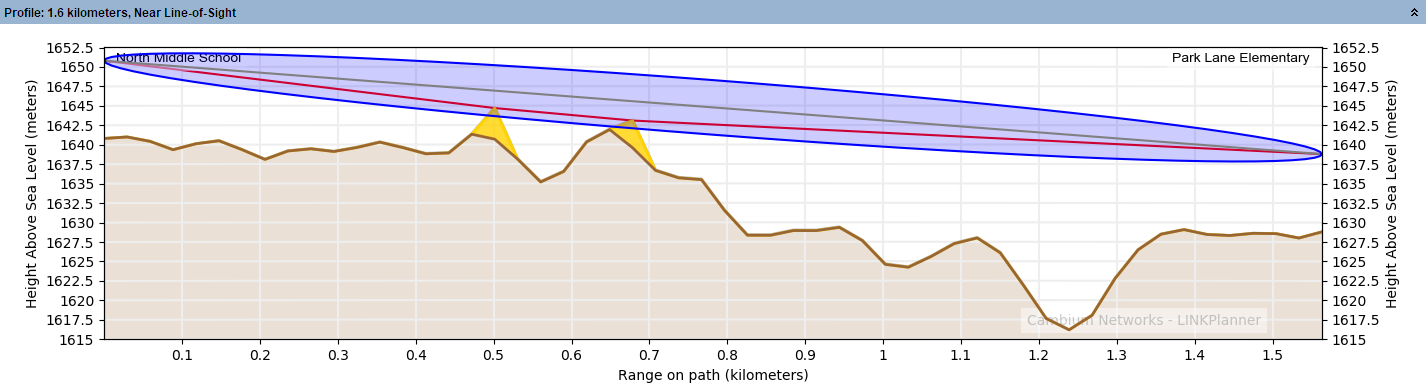
Profile Updated With Obstructions (in yellow)
When Use Clutter? is disabled obstructions are added to the path as individual points at the center of a pixel and the obstruction loss is calculated using ITU-R P.526-10, using the Cascaded Knife Edge Method.
Adding new points
If you would like to add an obstruction in between two of the existing profile points, you can add a new point using the Add Point  button.
Adding a Profile Point
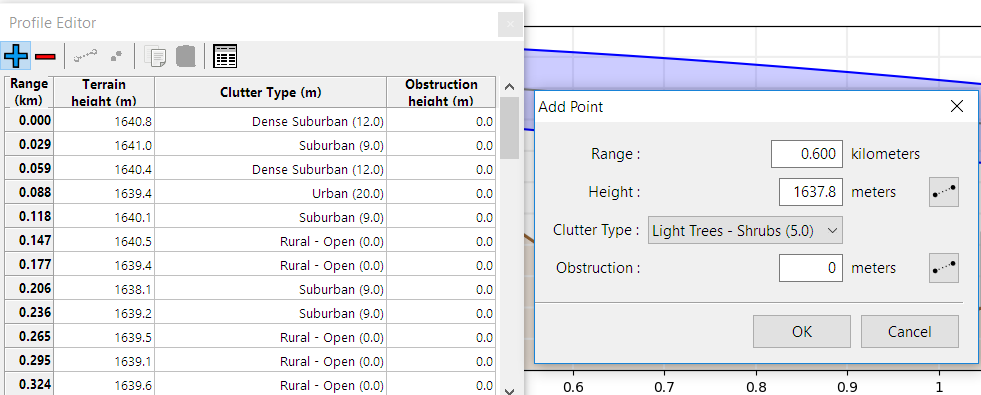
You need to specify the range along the path, the terrain height at that point, the clutter type (if using) and the obstruction height. For either of the height values, you can press the Estimate height button to enter a height based on the points either side of the new one, however the clutter type must be individually chosen.
Adding multiple new points
If you are on a short link (< 300m) the resolution of the terrain and clutter data may be too coarse to show all the detail you wish to include. To add multiple points select the Add Multiple Points ![]() button, then choose the point interval for the new points from the available list. The profile will then automatically have new points at the interval chosen with the terrain height interpolated between the known points.
button, then choose the point interval for the new points from the available list. The profile will then automatically have new points at the interval chosen with the terrain height interpolated between the known points.
This does not increase the resolution of the source data but allows you to quickly make adjustments to clutter and obstructions to add roads and define building edges in the profile.
Deleting points
You can remove points from the profile by selecting them and pressing the Delete Points  button. Any points except the first and last may be deleted.
Editing multiple points
Some types of obstruction, for example forests, may extend for some distance along the path. These can be represented in the profile by editing multiple points either in the clutter type or the obstruction height. To set the same clutter type for multiple points, select those points in the clutter type column, right click and choose Edit and then select the new clutter type from the drop down menu, which when selected is applied to all highlighted cells.
To set the same obstruction height for multiple points, select those points in the obstruction height column and type the new height. When you press Return, that height will be entered for all those points.
To adjust the heights for multiple points so that there is a constant gradient, set the heights at either end of the range, then select the range and click the Straight Line button  .
.

Setting a Constant Gradient
Copy a Path Profile
There are two methods for copying a path profile:
- Right-click on the Profile Visualization Chart with Clutter or Profile Visualization Chart without Clutter and choose Copy from the pop-up menu
- Open the Profile Editor with Clutter or Profile Editor and click

Pasting a Path Profile
There are two methods for pasting a path profile:
- Right-click on the :Profile Visualization Chart with Clutter or ref:profile and choose Paste from the pop-up menu
- Open the Profile Editor with Clutter or Profile Editor and click

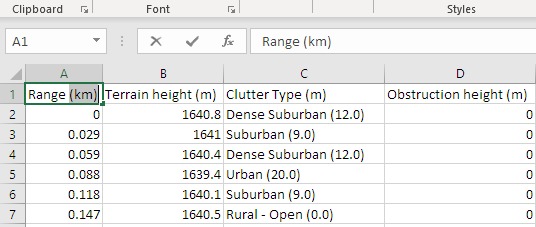
Editing a Profile as a Spreadsheet
Open the Profile Editor and click  . Once you have made
the appropriate changes to the profile, copy the information and paste
it back into LINKPlanner (see Pasting a Path Profile).
. Once you have made
the appropriate changes to the profile, copy the information and paste
it back into LINKPlanner (see Pasting a Path Profile).